Gitea چیست؟
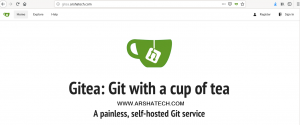
Gitea یک سرویس گیت و از دل پروژه Gogs می باشد که توسط جامعه توسعه دهندگان علاقه مند به پروژه های متن باز یا اپن سورس تحت لایسنس MIT توسعه یافته است. Gittea یک راه کار بسیار سبک برای گیت می باشد که به زبان Go نوشته شده است و Cross-platform می باشد به این معنا که شما میتوانید gitea را روی هر پلتفرمی که قابلیت اجرای کدهای Go را داشته باشد نصب کنید.
امروز میخواهیم به آموزش نصب gitea در سرورهای اوبنتو ۱۸.۰۴ بپردازیم. Gitea یک سرویس بسیار سبک برای git می باشد که اپن سورس بوده و هنگامی که شما میخواهید حداقل منابع را روی سرور داشته باشید این گزینه میتواند برای شما انتخاب درستی باشد. شما میتوانید gitea را روی یک سرور با یک هسته CPU و یک گیگابایت RAM نصب و مورد استفاده قرار دهید.
آموزش نصب gitea در اوبونتو ۱۸.۰۴
ابتدا یک هاست نیم مناسب برای سرور انتخاب میکنیم:
|
1 2 |
root@test:~# hostnamectl set-hostname gitea.arshatech.com root@test:~# hostnamectl |
|
1 2 3 4 5 6 7 8 9 |
Static hostname: gitea.arshatech.com Icon name: computer-vm Chassis: vm Machine ID: 34d6c80efcb84904868bfc5d2f707ffc Boot ID: ac88153b54d045fb825d9074be1f5d25 Virtualization: kvm Operating System: Ubuntu 18.04 LTS Kernel: Linux 4.15.0-22-generic Architecture: x86-64 |
در مرحله بعد ماشین را به صورت کامل به روزرسانی میکنیم:
|
1 2 |
root@gitea:~# apt update root@gitea:~# apt -y dist-upgrade |
در مرحله بعد nginx را به عنوان وب سرور نصب میکنیم:
|
1 |
root@gitea:~# apt -y install nginx |
حال در مرورگر خود آدرس هاست نیم را وارد کرده و از صحت نصب nginx مطمان میشویم:
|
1 |
http://gitea.arshatech.com |

سپس گیت را نصب کرده و نسخه نصبی را بررسی میکنیم:
|
1 2 |
root@gitea:~# apt -y install git root@gitea:~# git --version |
|
1 |
git version 2.17.1 |
در مرحله بعد MariaDB را بعنوان دیتابیس نصب میکنیم:
|
1 |
root@gitea:~# apt -y install mariadb-server mariadb-client |
و برای تامین امنیت آن دستور زیر را وارد کرده و پاسخ های صحیح را به سوالات آن میدهیم:
|
1 |
root@gitea:~# mysql_secure_installation |
|
1 2 3 4 5 6 7 8 9 10 11 12 13 14 15 16 17 18 19 20 21 22 23 24 25 26 27 28 29 30 31 32 33 34 35 36 37 38 39 40 41 42 43 44 45 46 47 48 49 50 51 52 53 54 55 56 57 58 59 |
NOTE: RUNNING ALL PARTS OF THIS SCRIPT IS RECOMMENDED FOR ALL MariaDB SERVERS IN PRODUCTION USE! PLEASE READ EACH STEP CAREFULLY! In order to log into MariaDB to secure it, we'll need the current password for the root user. If you've just installed MariaDB, and you haven't set the root password yet, the password will be blank, so you should just press enter here. Enter current password for root (enter for none): OK, successfully used password, moving on... Setting the root password ensures that nobody can log into the MariaDB root user without the proper authorisation. Set root password? [Y/n] <span style="color: #ff0000;">y</span> New password: Re-enter new password: Password updated successfully! Reloading privilege tables.. ... Success! By default, a MariaDB installation has an anonymous user, allowing anyone to log into MariaDB without having to have a user account created for them. This is intended only for testing, and to make the installation go a bit smoother. You should remove them before moving into a production environment. Remove anonymous users? [Y/n] <span style="color: #ff0000;">y</span> ... Success! Normally, root should only be allowed to connect from 'localhost'. This ensures that someone cannot guess at the root password from the network. Disallow root login remotely? [Y/n] <span style="color: #ff0000;">y</span> ... Success! By default, MariaDB comes with a database named 'test' that anyone can access. This is also intended only for testing, and should be removed before moving into a production environment. Remove test database and access to it? [Y/n] <span style="color: #ff0000;">y</span> - Dropping test database... ... Success! - Removing privileges on test database... ... Success! Reloading the privilege tables will ensure that all changes made so far will take effect immediately. Reload privilege tables now? [Y/n] <span style="color: #ff0000;">y</span> ... Success! Cleaning up... All done! If you've completed all of the above steps, your MariaDB installation should now be secure. Thanks for using MariaDB! |
سپس سرویس MariaDB را ری استارت میکنیم:
|
1 |
root@gitea:~# systemctl restart mariadb |
در مرحله بعد با یوزر root که برای آن یک پسورد تعیین کردیم لاگین کرده و دیتابیس و یوزر مورد نظر را میسازیم:
|
1 |
root@gitea:~# mysql -u root -p |
|
1 2 3 4 5 6 7 8 9 10 11 12 13 14 15 16 17 18 19 20 21 22 23 24 25 26 27 28 |
Enter password: Welcome to the MariaDB monitor. Commands end with ; or \g. Your MariaDB connection id is 30 Server version: 10.1.41-MariaDB-0ubuntu0.18.04.1 Ubuntu 18.04 Copyright (c) 2000, 2018, Oracle, MariaDB Corporation Ab and others. Type 'help;' or '\h' for help. Type '\c' to clear the current input statement. MariaDB [(none)]> CREATE DATABASE gitea; Query OK, 1 row affected (0.00 sec) MariaDB [(none)]> CREATE USER 'giteauser'@'localhost' IDENTIFIED BY 'new_password_here'; Query OK, 0 rows affected (0.00 sec) MariaDB [(none)]> GRANT ALL ON gitea.* TO 'giteauser'@'localhost' IDENTIFIED BY 'user_password_here' WITH GRANT OPTION; Query OK, 0 rows affected (0.00 sec) MariaDB [(none)]> GRANT ALL ON giteadb.* TO 'gitea'@'localhost' IDENTIFIED BY 'gitea' WITH GRANT OPTION; MariaDB [(none)]> ALTER DATABASE gitea CHARACTER SET = utf8mb4 COLLATE utf8mb4_unicode_ci; Query OK, 1 row affected (0.00 sec) MariaDB [(none)]> FLUSH PRIVILEGES; Query OK, 0 rows affected (0.01 sec) MariaDB [(none)]> EXIT; Bye |
سپس با استفاده از یک ویرایشگر متن فایل تنظیمات مربوط به دیتابیس را باز میکنیم:
|
1 |
root@gitea:~# vim /etc/mysql/mariadb.conf.d/50-server.cnf |
و در انتها تنظیمات زیر را وارد میکنیم:
|
1 2 3 |
innodb_file_format = Barracuda innodb_large_prefix = 1 innodb_default_row_format = dynamic |
و در انتها سرویس MariaDB را ری استارت میکنیم:
|
1 |
root@gitea:~# systemctl restart mariadb |
حال شرایط را برای gitea با ساخت یوزر و تنظیمات مربوط به آن مهیا میکنیم:
|
1 |
root@gitea:~# adduser --system --shell /bin/bash --gecos 'Git Version Control' --group --disabled-password --home /home/git git |
|
1 2 3 4 |
Adding system user `git' (UID 108) ... Adding new group `git' (GID 115) ... Adding new user `git' (UID 108) with group `git' ... Creating home directory `/home/git' ... |
در مرحله بعد ساختار مناسب دایرکتوری ها و فایل های لازم را ایجاد میکنیم:
|
1 2 3 4 5 6 |
root@gitea:~# mkdir -p /var/lib/gitea/{custom,data,indexers,public,log} root@gitea:~# chown git:git /var/lib/gitea/{data,indexers,log} root@gitea:~# chmod 750 /var/lib/gitea/{data,indexers,log} root@gitea:~# mkdir /etc/gitea root@gitea:~# chown root:git /etc/gitea root@gitea:~# chmod 770 /etc/gitea |
در ادامه gitea را نصب میکنیم، سطح دسترسی اجرائی را به آن میدهیم و در انتها فایل باینری دانلود شده را در مسیر global آن قرار میدهیم:
|
1 2 3 |
root@gitea:~# wget -O gitea https://dl.gitea.io/gitea/1.9.0/gitea-1.9.0-linux-amd64 root@gitea:~# chmod +x gitea root@gitea:~# cp gitea /usr/local/bin/gitea |
حال سرویس gitea را ایجاد میکنیم:
|
1 |
root@gitea:~# vim /etc/systemd/system/gitea.service |
|
1 2 3 4 5 6 7 8 9 10 11 12 13 14 15 16 17 18 19 20 21 22 23 24 25 26 27 28 29 30 31 32 |
[Unit] Description=Gitea (Git with a cup of tea) After=syslog.target After=network.target #After=mysqld.service #After=postgresql.service #After=memcached.service #After=redis.service [Service] # Modify these two values and uncomment them if you have # repos with lots of files and get an HTTP error 500 because # of that ### #LimitMEMLOCK=infinity #LimitNOFILE=65535 RestartSec=2s Type=simple User=git Group=git WorkingDirectory=/var/lib/gitea/ ExecStart=/usr/local/bin/gitea web -c /etc/gitea/app.ini Restart=always Environment=USER=git HOME=/home/git GITEA_WORK_DIR=/var/lib/gitea # If you want to bind Gitea to a port below 1024 uncomment # the two values below ### #CapabilityBoundingSet=CAP_NET_BIND_SERVICE #AmbientCapabilities=CAP_NET_BIND_SERVICE [Install] WantedBy=multi-user.target |
و سپس جهت شروع خودکار هنگام بوت سرور دستورات زیر را وارد میکنیم:
|
1 2 3 |
root@gitea:~# systemctl daemon-reload root@gitea:~# systemctl enable gitea root@gitea:~# systemctl start gitea |
حال برای کانفیگ nginx ابتدا فایل پیش فرض را پاک میکنیم:
|
1 |
root@gitea:~# rm /etc/nginx/sites-enabled/default |
سپس جهت تنظیمات reverse proxy با یک ویرایشگر متن فایل زیر را باز میکنیم:
|
1 |
root@gitea:~# vim /etc/nginx/sites-available/git |
و آن را به صورت زیر کانفیگ میکنیم:
|
1 2 3 4 5 6 7 8 9 10 11 12 13 14 15 16 17 18 19 20 21 22 23 24 25 26 27 28 |
upstream gitea { server gitea.arshatech.com:3000; } server { listen 80 default_server; listen [::]:80 default_server; server_name gitea.arshatech.com; root /var/lib/gitea/public; access_log off; error_log off; location / { try_files maintain.html $uri $uri/index.html @node; } location @node { client_max_body_size 0; proxy_pass http://gitea.arshatech.com:3000; proxy_set_header X-Forwarded-For $proxy_add_x_forwarded_for; proxy_set_header X-Real-IP $remote_addr; proxy_set_header Host $http_host; proxy_set_header X-Forwarded-Proto $scheme; proxy_max_temp_file_size 0; proxy_redirect off; proxy_read_timeout 120; } } |
تغییرات را ذخیره و از آن خارج میشویم. سپس جهت تست صحت تنظیمات دستور زیر را وارد میکنیم:
|
1 |
root@gitea:~# nginx -t |
|
1 2 |
nginx: the configuration file /etc/nginx/nginx.conf syntax is ok nginx: configuration file /etc/nginx/nginx.conf test is successful |
سپس با ایجاد یک soft link تنظیمات آن را فعال میکنیم:
|
1 |
root@gitea:~# ln -s /etc/nginx/sites-available/git /etc/nginx/sites-enabled |
سپس nginx را ریلود میکنیم:
|
1 |
root@gitea:~# systemctl reload nginx |
حال کافیست در مرورگر آدرس هاست نیم خود را به صورت زیر وارد کرده تا وارد مراحل نصب شویم:
|
1 |
http://gitea.arshatech.com/install |

نکته: با توجه به اینکه هنگام نصب gitea باید داده های مهمی را در فیلدهای مورد نظر پر کنید و از طرفی سرویس شما فاقد پروتکل امنیتی SSL می باشد ما در این مرحله SSL را روی سرور نصب میکنیم.
برای نصب lets encrypt بر روی سرور ابتدا با دستور زیر certbot را وارد مخازن اوبونتو میکنیم:
|
1 |
root@gitea:~# add-apt-repository ppa:certbot/certbot |
سپس certbot انجین ایکس را نصب میکنیم:
|
1 |
root@gitea:~# apt -y install python-certbot-nginx |
سپس دسترسی های لازم nginx و https را به سرور میدهیم:
|
1 |
root@gitea:~# ufw allow https |
در مرحله بعد با دستور زیر SSL را برای دامنه مورد نظر فعال میکنیم:
|
1 |
root@gitea:~# certbot --nginx -d gitea.arshatech.com |
|
1 2 3 4 |
Saving debug log to /var/log/letsencrypt/letsencrypt.log Plugins selected: Authenticator nginx, Installer nginx Enter email address (used for urgent renewal and security notices) (Enter 'c' to cancel): email@arshatech.com |
بعد از اجرای دستور یک ایمیل مطابق بالا وارد میکنیم و مراحل را ادامه میدهیم. در این گام قوانین و شرایط lets encrypt را تایید میکنیم:
|
1 2 3 4 5 6 7 |
- - - - - - - - - - - - - - - - - - - - - - - - - - - - - - - - - - - - - - - - Please read the Terms of Service at https://letsencrypt.org/documents/LE-SA-v1.2-November-15-2017.pdf. You must agree in order to register with the ACME server at https://acme-v02.api.letsencrypt.org/directory - - - - - - - - - - - - - - - - - - - - - - - - - - - - - - - - - - - - - - - - (A)gree/(C)ancel: a |
و پاسخ سوال بعد را با n میدهیم:
|
1 2 3 4 5 6 7 |
- - - - - - - - - - - - - - - - - - - - - - - - - - - - - - - - - - - - - - - - Would you be willing to share your email address with the Electronic Frontier Foundation, a founding partner of the Let's Encrypt project and the non-profit organization that develops Certbot? We'd like to send you email about our work encrypting the web, EFF news, campaigns, and ways to support digital freedom. - - - - - - - - - - - - - - - - - - - - - - - - - - - - - - - - - - - - - - - - (Y)es/(N)o: n |
سوال آخر را نیز با عدد ۲ جهت ریدایرکت کردن همه درخواست ها به صورت خودکار به https پاسخ میدهیم:
|
1 2 3 4 5 6 7 8 |
Please choose whether or not to redirect HTTP traffic to HTTPS, removing HTTP access. - - - - - - - - - - - - - - - - - - - - - - - - - - - - - - - - - - - - - - - - 1: No redirect - Make no further changes to the webserver configuration. 2: Redirect - Make all requests redirect to secure HTTPS access. Choose this for new sites, or if you're confident your site works on HTTPS. You can undo this change by editing your web server's configuration. - - - - - - - - - - - - - - - - - - - - - - - - - - - - - - - - - - - - - - - - Select the appropriate number [1-2] then [enter] (press 'c' to cancel): 2 |
همچنین مد نظر داشته باشید که اعتبار این گواهی ۹۰ روزه است و برای تمدید خودکار آن باید دستور زیر را در کران جاب وارد کنید:
|
1 |
certbot renew --dry-run |
حال با ریفرش مرورگر خود خواهید دید به صورت خودکار سرویس شما با پروتکل SSL بارگزازی میشود. پس حالا با خیال راحت تر مراحل نصب gitea را ادامه میدهیم:
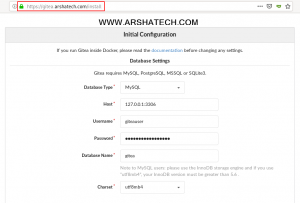
|
1 |
https://gitea.arshatech.com/install |

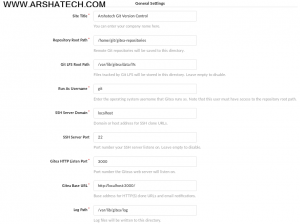
در این مرحله حتما نام کاربری و رمز عبوری را که هنگام کانفیگ دیتابیس تخصیص داده اید وارد نمائید و در ادامه:

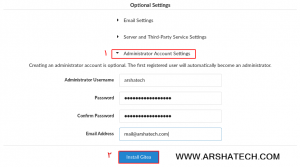
و در آخر حتما یک کاربر با دسترسی admin برای خود ایجاد کنید:

در انتها بر روی گزینه Install Gitea کلیک نمائید. همه چیز تمام است و سرویس گیت شما آماده استفاده می باشد.


